Epoxy flooring Epoxyden Floor execution specification
Epoxy flooring Epoxyden Floor execution specification
Epoxy flooring Epoxyden Floor execution specification www.denber-paints.co.il
Performance specification for casting epoxy floors
Area preparation:
- If there is light grease on an existing epoxy coating and the grease has not penetrated the concrete – dissolve with degreaser Z by rubbing (road sweeper or machine) and washing with water, after drying – start polishing.
- If there is grease penetration into the concrete – spreading an emulsifier into N oil “for absorbing the grease” and washing with water until foam stops coming out. After drying – start polishing.
- And if there is a layer of grease/hardened soot – spread carbon cleaner and rub until fully dissolved/softening and mechanical scraping until you get concrete free of oil/hardened soot, spread into N oil and rinse with water. After drying – start polishing.
- It should be checked while washing with water when the floor is wet, this PH level of acidity should be neutral = 7-8, if it is higher, the casting date should be postponed until at least 28 days from the casting day if the concrete is new. If the concrete is older and still has a high level of acidity, neutralize with a diluted caustic soda solution, rinse and check again. until getting a 7-8 result.
Epoxy flooring execution specification Epoxidan Fluor 100% solids www.denber.net
- On an old coating layer – for renewal – polishing with paper sander No. 26 until a matte surface is obtained.
- On concrete – diamond polishing with a double helicopter machine with 6 diamond discs or a large diamond disc “7-“9 for small areas. During polishing, the machine must be connected to a vacuum system, and the polishing worker must wear protective glasses and a dust mask.
- Before proceeding with the application of the primer layer, the strength of the concrete must be tested. Pull-off test with a device that meets the ASTM-D4541 standard. Pull-off strength must be greater than 1.5 MPa. Weaker concrete will crumble in the future under pressure together with the coating. In this case, you should not continue without the customer’s written confirmation that he is aware of the problem and insists on continuing the coating work at his own risk .
Epoxy flooring execution specification Epoxyden Floor 100% solids
Performance specification for casting epoxy floors
Concrete moisture test:
- Method 1 – Moisture testing device with penetrating spikes – required result is less than 4% moisture, the test will be done on every 50 square meters of the area.
- Method 2 – gluing a 46×46 cm transparent nylon/polyethylene sheet, with 5 cm wide adhesive paper all around for complete sealing. After at least 16 hours – lifting the sheet and manually checking that there is no moisture on the concrete and the lower part of the sheet that was in contact with it. The test will be done on every 50 square meters of the area.
- Do not start applying primer if the humidity is higher than 4%, wait for natural drying or heat for forced drying (heating ovens/air conditioners/gas stove) and ventilation.
Working temperatures and air humidity:
- The concrete temperature should be more than 10 degrees Celsius. So is the air temperature, but not more than 35 degrees.
- The air humidity should be lower than 85%.
- If these conditions are not met, do not perform the work. After a very cold night, the concrete is very cold (less than 10 degrees) and hot air that comes in from a sunny day to the next day, creates a large temperature difference between the lower and upper layer of the casting (in a casting of 3 mm or more), which may cause the development of white spots on the surface or the shrinkage of the coating .
- Check the dew point in the work area and work only if the temperature is at least 3-4 degrees higher.
- Be sure to work on an area that is completely dry from any moisture, water, dew, etc., these will cause craters (holes in the coating) and/or whitening of the cast surface.
Performance specification for casting epoxy floors
Primer layer:
- Mix part A + part B well with an electric stirrer until you get a uniform solution.
- Applying a layer of epoxy flour primer 1 liter per 5 square meters of concrete. By applying/spraying.
- On an old existing coating layer there is no requirement for a primer and provided that there are no gaps in the coating exposing the concrete. Even then, primer can only be applied to bald spots. High-quality polishing of every surface in the coating is mandatory before applying a renewal layer.
- If there is no other choice (it is recommended to carry out proactive drying with a gas dog or a heating blower) you should pour on small damp parts, you should use “Epoxidan Fluor Primer 450” designed for damp areas.
Grout casting:
- If there are “bald areas” in the floor/large holes, height differences must be filled with epoxy grout .
- Preparation of grout mixture: mix part A + part B. And while mixing, add quartz into the bucket until you get a thick mixture like concrete.
- The mixture should be poured immediately into the clearings/holes and level two and a half with a mortar. Until full compression is obtained and leveling to “zero” height.
- If slopes are required – epoxy grout should be poured to obtain the desired slopes.
You built roller coasters:
- The rolls will be made in all the floor-to-wall connections, and this before starting the process of casting the floor with epoxy/denbergloss floor. The size and shape of the roller will be defined by the orderer in advance. Standard rollers 5×5 cm triangular profile at a 45 degree angle. Both larger and rounded rollers can be made.
- The roller is applied with a thick epoxy material ” Epoxyden putty ” which is hard with slight flexibility. Prepare a base mixture + hardener and mix well with a large professional electric stirrer. Spread with a spatula of the appropriate size to obtain the roll of the required size or with rounded jelly for rolls to obtain rounded rolls. You must wait up to 24 hours before starting casting for a final coating of the reel.
- In clean/other rooms, flexible decorative roller blinds can be affixed upon request.
- If there are drainage canals in the area, roller blinds must be made in the vertical and horizontal corners of the canals as well. Channels where the slope is incorrect or insufficient must be made with epoxy grout with a suitable slope for the drainage openings.
Epoxy flooring execution specification Epoxyden Floor 100% solids
Performance specification for casting epoxy floors
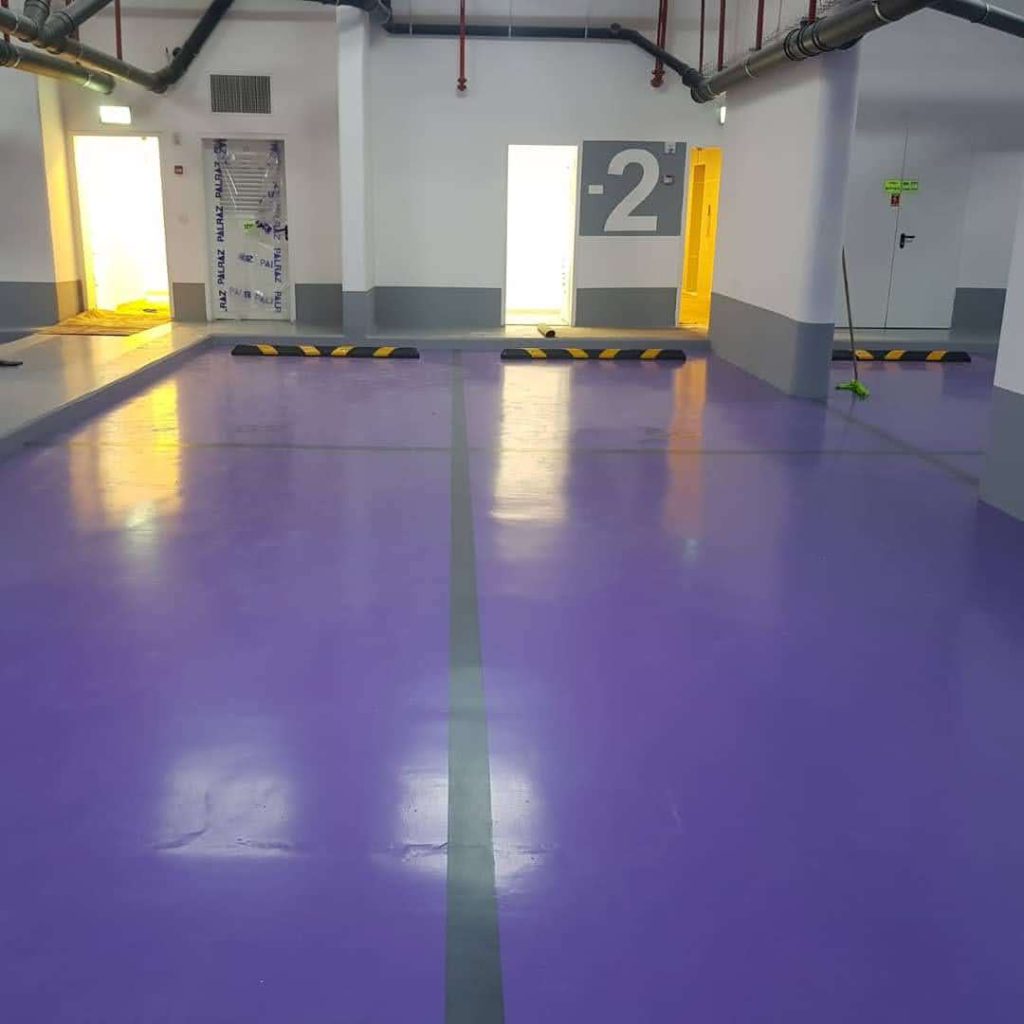
100% solids epoxy floor casting :
- Mix part A 10 liters + part B 5 liters. and together 15 liters and add quartz up to 18 liters.
- Transfer to a clean container and mix again – mandatory. This within up to 10 minutes to prevent heating and spoilage of the material.
- Immediately pour the entire mixture in the corner of the surface to be coated and level with a toothed ruler to the required thickness. Add and continue pouring sections until you complete about 2 meters of pouring strip from the wall.
- Go with a spiked roller to remove bubbles on the cast surface.
- Continue casting another area and again with the roller and so on until the entire casting is finished. Be sure to work quickly and intensively without breaks to maintain the casting sequence until the end.
A clear protective layer (if required) to reduce the visibility of scratches and tire marks and UV protection to prevent fading is used:
- Within 24 hours from the end of the casting, apply/spray a transparent layer of ” Denbergloss Floor transparent ” in an amount of 1 liter per 8 square meters. Mix part A with part B in a ratio of 2:1 and apply with a roller a thin and uniform layer. For spraying, dilute with Thinner 11 5-30% depending on the spraying equipment. For spraying in airless 5-10%, for other equipment up to 30% to obtain a smooth layer.
- 24 hours later – another identical layer.
Anti-slip transparent layer (if required):
- Within 24 hours from the end of the casting, apply with a roller an even layer of Denbergloss Floor Antislip . The layer will be uniform and decorative with a uniform dispersion of the Teflon grains to obtain a roughness of R-9-10
- If a rougher roughness to the level of R11 is required: within 24 hours from the end of the casting, apply a transparent layer of 1 mm ” Epoxyden Floor 100% transparent ” and on the wet layer evenly and densely sow 2.5 mm corborundum so that it sinks into the transparent coating and protrudes 1 -1.5 mm above it for a rough, dense and uniform roughness.
Epoxy flooring execution specification Epoxyden Floor 100% solids
Performance specification for casting epoxy floors
Concrete repairs and concrete restoration damaged floors:
Sealing cracks, gaps and spaces in concrete:
- Fractures and cracks larger than 0.5 mm will be opened with a disk and filled as required. Vacuum the dust thoroughly and apply a quick-drying transparent primer of the ” Polyflex Transparent Primer ” type, and fill with an elastomeric putty mixture ” Polyflex 225 ” up to the height of “zero” .
Concrete and rebar repairs:
- In places where the iron is exposed. Mining will be carried out to a depth until the rusted iron is fully discovered. At least 3 cm in its entire circumference as well as 5 cm on its sides to expose rust-free iron. The iron must be polished well on all sides with a sharpener/steel brush/sandpaper to obtain a white and clean iron. The dust must be vacuumed. Apply a thin layer of ” Zinkot ” for cold galvanizing to stop rusting. Apply a layer of ” Epoxydan sulcot ” for barrier protection, (this epoxy attaches well to fresh concrete that is poured on it). If the carved area is smaller than 20 cm, Epoxy grout can be poured for filling and leveling, the grout will be an integral part of the epoxy/polyurethane casting that will be performed on the floor. If the carved area is larger than 20 cm. – Concrete can be poured and smoothed to “zero” height. (The problem is that the curing of the concrete will last up to 28 days and will delay the casting of the floor covering). Pouring the concrete to fill the fracture is significantly cheaper than pouring the grout.
DenBer Projects Company – Execution with over 30 years of experience
 English
 עברית
עברית Русский