Thermal insulation of a freezing room. Specifications for coating the floor of cooling/freezing rooms
Thermal insulation of a freezing room. Specifications for coating the floor of cooling/freezing rooms

Thermal insulation for freezer rooms Denver Paints www.denber-paints.co.il
Description:
Cold room floors and deep freezing. Requirement of resistance to temperature changes from plus 40 degrees to minus 40 degrees at least. Resistance to standing water freezing on the surface is required. Resistance to animal fats is required. Resistance to acidity resulting from organic rot and liquids (fruits and vegetables) is also required. Abrasion resistance is also required. Complete sealing is required to prevent liquids from passing under the coating. These will cause leaks in the floors below the cooling rooms and/or stagnation of water that has penetrated the concrete. Water that will expand in stagnation and cause the concrete to crack. Worst of all is contact with iron, which will swell and crack the concrete.
The specification below is a suggestion only. Due to other variable factors, such as the frequency of defrosting, the thickness of the concrete floor, the type of floor (concrete or planks), etc. and at the discretion of the customer.
Preparation of space in cold rooms that have already worked:
- Work areas on concrete floors of industrial refrigerators intended for coating and sealing. – Will be fenced off and blocked so that water does not reach either by flow or transfer while walking from wet surfaces around those on which they are working. and damp walls and ceiling from condensation will be wiped.
- Greasy floor – before drying the floor, spread ” Al Shemen N ” which is an emulsifier that dissolves fats in an amount of 1 liter per square meter, rub well with a street sweeper or alternatively with a washing machine. After 15-20 minutes wash with large amounts of water Hot under pressure. Using a pressure washing machine at least 150 atmospheres. This step is not necessary in new cold rooms.
- During the washing process, the emulsifiers (of God oil N) will connect to the fats and produce a substance that dissolves in water. Thus, during washing, foam will be created. Continue to wash with hot water as mentioned until no more foam comes out.
- Drying – removing water with wipers, thorough drying with a gas dog until a completely dry floor is obtained.
- If there is a possibility in terms of times – give the floor two days to remove moisture (heaters can be added).
- Before starting polishing, go over all surfaces again with a gas dog for final drying.
- An audit can be performed with a spiked hygrometer or with the nylon/plastic sheet method. This should be lower than 4%.
Thermal insulation of a freezing room, execution specification
Specifications for performing floor thermal insulation coating for freezer rooms
Polishing:
- Diamond polishing with a planetary polishing machine with 6 diamond discs or a large diamond disc “7-“9 for small areas or a diamond disc 3” for corners. At least 1 mm must be removed from the concrete layer. While polishing, the machine and discs must be connected to a vacuum system. The polishing worker must wear safety glasses and a dust mask.
- Every part of the floor must be polished. If there are cracks/dents, polish them with small sanders. Enter them so that the entire area is polished.
Opening and adding expansion seams and a hidden brake tooth:
- Existing expansion seams should be polished and widened and deepened with a diamond “V” disc.
- Expansion seams must be added so that every 2 m at least has a seam. At least 2 cm wide and at least 3 cm deep.
- Around the cooling room and at a distance of 20 cm from it, a brake tooth must be cut. 2 cm wide and at least 4 cm deep.
Vacuuming:
- The dust must be vacuumed from the floor with a quality vacuum so that all the “porims”, recesses, fractures, expansion joints and braking teeth in the concrete will open and be free of dust. (Moving your hand on the floor will leave a clean hand without dust)
Primer layer:
- The primer suitable for damp floors is “Epoxyden Fluor Primer 450″, for a new floor you can use the primer ” Epoxyden Floor Primer transparent “. Mix part A + part B in the appropriate ratio, mix well with an electric stirrer until a uniform solution is obtained. It can be diluted with epoxy thinner 4/100 and sprayed with Airless, or without dilution and spread with wipers and rollers to get full impregnation in the floor so that it is completely sealed. This step is very important – an unsealed floor will emit gases which will cause bubbles in the top coating and holes.
- Applying a layer of primer 1 liter per 4-5 m2 of concrete. By applying/spraying. Until the substructure is saturated. If a perfect seal is not obtained and open “pores” are still visible in the substructure, apply another layer of primer. In any case, it is recommended to apply 2 layers of primer.
- Rollers – tape should be attached at a height of 11 cm from the floor along all the walls and primer should be painted up to the height of the tape. It is necessary to stick/apply flexible rollers at floor-wall connections of a minimum size of 5×5 cm which will become an integral part of the floor and they must paint the primer in the second layer. The rolls must be made from certified ” Thermoseal Polyflex ” with Cabosil powder to obtain a thick mixture that is convenient for applying the rolls at 45 degrees or semi-rounded.
Specifications for performing floor thermal insulation coating for freezer rooms
Filling cracks and seams:
- Every crack and seam and brake tooth (which were opened and deepened and widened as above with a diamond disc
“V” profile up to white concrete and free of impurities, and which have been painted with a primer) must be filled with thermoseal polyflex material which is elastomeric up to “zero” height.
- Deep expansion joints must be filled at the root with a backing profile of suitable diameter.
- “Thermoseal Polyplex” should be poured into the seams and cracks and leveled with putty to a “zero” height.
- The mixture can be thickened with Cabosil powder to fill cracks/seams on a slope.
Grout casting:
- If there are “bald areas” in the floor/large holes, the height differences must be filled with thermoseal polyplex plus 33% quartz and leveled with grout.
- The mixture should be poured immediately into the clearings/holes and leveled two and a half times with grout until full compaction is obtained and leveled to “zero” height.
- In this way, damaged slopes, fractures near drainage channels and holes in the floor and in the rolls must also be repaired. For sloped parts, Cabosil powder should be added to the mixture for certification to prevent the material from sliding.
Installing rollers:
- Ready rolls – 10 x 10 cm to stick to the corner with ” epoxyden glue “, apply at least 1 mm of glue on the roll on the side that sticks to the floor and on the side that sticks to the wall, and this with a suitable comb. Make sure that the floor and wall areas are free of any bumps.
- You can pour a roll instead of a mixture of Thermoseal Polyplex with a lot of Cabosil, and process and straighten and smooth with a putty knife to get a uniform semi-rounded roll or at 45 degrees.
Brake tooth filling:
- The purpose of the braking tooth is to stop the gravitational force of the floor coating which will contract during freezing and expand back during thawing. and to prevent the transfer of this force to the rest of the surrounding floor which is not flexible. Something that will cause the coating to crack and/or lift.
- Important – the purpose of the braking tooth is to prevent/reduce the passage of cold from the floor of the refrigerator to the rest of the surrounding floor.
- The braking tooth must be filled with “Thermoseal Polyplex” which creates a flexible filling and thermal separation.
Thermal insulation of a freezing room, execution specification
Specifications for performing floor thermal insulation coating for freezer rooms
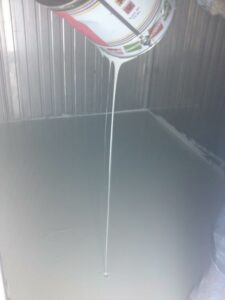
Casting Thermoseal Polyplex 100% solids:
- Stick scotch tape on the border of the brake tooth and the border of the castings (including above the rollers inside the cooling/freezing room) and cover the stainless steel channels and plug the sewer openings with cloth/sponge/styrofoam/nylon.
- Mix a small amount of part A + part B carefully with an electric stirrer to obtain a uniform mixture. Transfer to another vessel and mix again (otherwise unmixed material will remain on the sides and bottom).
- With a brush, apply the material on the rollers up to the height of the sellotape stuck on top. And then go over again with the brush to get an even surface.
- Continue and prepare a mixture of a bucket, mix well, transfer to another vessel and mix again and immediately pour the mixture in the corner of the area to be coated and along the wall and level with a toothed bar to the required thickness of 5 mm when the roller should be coated again and let the material slide to the floor. Add and continue pouring sections until the completion of approx. – 2 meters of casting strip from the wall (so that there will be access to go over it with a spike roller).
- Go with a spiked roller to remove bubbles on the cast surface.
- Continue casting an additional area as above and again with the roller and so on until the end of the entire casting. Be sure to work quickly and intensively without breaks to maintain the sequence of casting until the end.
- Caution – in slow work the material may boil in the bucket before pouring and then it should not be used.
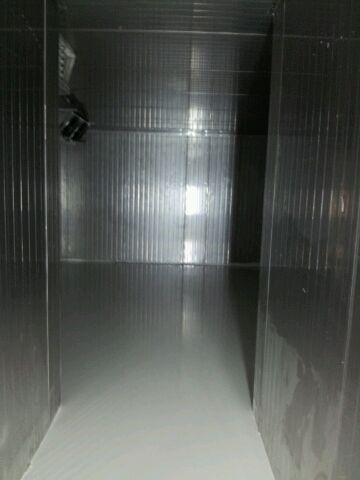
That’s it for the specification for making a floor of cold/freezing rooms on the ground without a floor below.
If the cooling/freezing room is not on the ground floor and there is an active floor below, you should wait several months and see if there is condensation on the ceiling of that floor. If condensation forms, an additional thermal insulation step is necessary to remove the dew point so that the temperature difference between the cooling/freezing room and the temperature on the floor below drops below 14 degrees Celsius.
Specifications for performing floor thermal insulation coating for freezer rooms
Phase B. Hall ceiling insulation under the cooling/freezing room:
- Removing lamps and any interfering element. Cleaning the ceiling, light polishing with sandpaper and dust cleaning.
- Applying 2 layers of ” Thermoseal 200 ” (nano paint for one-component water-based thermal insulation)
- Attaching 10 cm gray insulating plates or 5 cm polyphan with “styrofoam glue” and anchoring with a 15-20 cm plastic dowel
- Apply 2 layers of “Thermoseal 200” on the plates.
Step 2 should only be performed if condensation forms, in many cases where the concrete layer is 30-40 cm thick, no condensation is formed at all and there is no need for step 2. However, on floors with a thickness of 20 cm or tiles or those that were cast on styrofoam molds it is possible Thickening. In these it will be necessary in phase B to also thicken the cold room floor to 7 mm.
Denber Projects Company – Execution with over 30 years of experience

 English
 עברית
עברית Русский